


ESP32-CAM – Espressif ESP32 WiFi Bluetooth BLE Module and 2MP Camera


CAD 12.95
| Need more than we have? Order now, we will ship when back in stock. Lead time about 2-3 weeks. See our backorder policy. |
| Quantity | 3 - 9 | CAD 11.66 |
| Quantity | 10 - 24 | CAD 11.33 |
| Quantity | 25 + | CAD 11.01 |
- Description
- Reviews (1)
Description
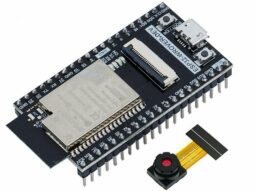
The ESP32 CAM module comes with the well-known high-performance Espressif ESP32 Wifi+Bluetooth+BLE controller chip and an OV2640 camera module with 2MP resolution.
Specifications:
– Main frequency up to 240MHz, up to 600 DMIPS
– 520 KB SRAM, 2M PSRAM
– UART/SPI/I2C/PWM/ADC/DAC Interfaces
– Micro-SD memory card slot
– Lwip and FreeRTOS operating system
– Supports Smart Config/AirKiss one-click distribution network
– OmniVision OV2640 camera module included (1600 x 1200 px)
Camera Lens Options (available in our store):
– 65-75° (included with ESP32-CAM module)
– 120° Wide Angle (SKU 26658)
– 160° Fisheye horizontal (SKU 26659)
– 160° Fisheye vertical (SKU 26660)
The ESP32 CAM module comes in a very small form factor of just 27 x 40mm and fits perfectly on a breadboard for your experiments. We recommend GitHub for software downloads and code examples.
This is the recommended first step to start tinkering with it:
– Follow the instructions on this website: Randomnerdtutorials.com
– Select “AI Thinker ESP32-CAM” as the board in Arduino IDE
– Change communication speed to 115200
– Select the corresponding COM port in Arduino IDE
– Uploading the code for the cam server demo provided on the website using Arduino IDE:
a) the upload starts possibly automatically, then wait until it has finished
b) Arduino IDE shows “connecting…” and the upload only starts after pressing “reset” on your ESP32 module
– Keep following the procedure described in the tutorial
If you receive an error message “detected camera not supported” you should double-check that the selected module in your sketch is “AI Thinker”.
These camera modules can be a little more tricky than an Arduino UNO. Don’t give up, keep trying, reading, and trying again, if it doesn’t work right away.
1 review for ESP32-CAM – Espressif ESP32 WiFi Bluetooth BLE Module and 2MP Camera
Add a review
You must be logged in to post a review.
Related products
-
 Quick View
 -
 Quick View
 -
 Quick View
 -
 Quick View
 -
 Quick View
 -
 Quick View
 -
 Quick View


john.witherspoon –
Just received this board and confirmed it works as advertised without difficulty. I just followed the Random Nerd tutorial as linked in the description. I obtained a surprisingly sharp image on my browser using the Arduino example code – this is quite a sophisticated example with many detailed controls including face recognition.
Note that I needed a 5V FTDI to program it. Also, the board is not exactly breadboard friendly since the reset button must be pressed to upload and it’s below the circuit board when attached to a breadboard. The reset isn’t brought out to a pin so its a little awkward to program. I needed 4 m-f and one m-m dupont jumpers to wire to the FTDI Basic board.
UNIVERSAL-SOLDER –
Thank you for your review. We have another model that comes with a programming adapter and makes these things way easier. You might have decided on the cheaper one to save the extra buck, but then you will need an external programmer, of course. Running this module on a breadboard is quite unusual if you are not using it to control the spin of your ceiling fan 😉